The 180 Degree Rule
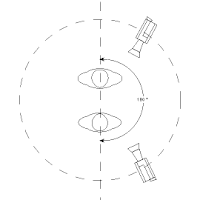
The 180 degree rule is set to establish a relationship between two characters or 'subjects' without confusing the audience. With this there is an invisible line which the two c
 haracters/ subjects are standing on and the camera must stay on one side of the line at all times in order to avoid confusion as the audience automatically associate certain characters to be on certain sides of the shot, changing this will reverse the characters positions and cause confusion. The only way of breaking the 180 degree rule without causing confusion is if the camera shows it being broken by panning around the back of one character for instance with the other character still in view so it is visible that the camera angle is being changer but both characters are still in the same position.
Shot /Reverse Shot
This is where there is a shot of one character looking at another, followed by a reverse shot of the other character looking back at them.
Match on Action
This is where action begins in one shot and continues into another shot to create two different views of the same action at the same moment in the same movement.
We were then asked to make a short film that would include those techniques. Here is our plot.
Original Ideas
- Jonny rushes down the corridor. With a pan shot of him.
- He stops at the door and thinks for a minute. The camera is focussed on the side of Jonny.
- The camera then moves for a close up of the door and his hand reaching for the handle.
- The camera then moves to the inside of the room having a medium shot of the door using 'match on action'.
- The camera then pans Jonny from the top of the room (birds eye) walking to a seat opposite Freya, the other character.
- The camera will then use the '180 degree rule' to concentrate on the actors and their conversation using over the shoulder shots and 'shot/ reverse shot'.
- At the end of the conversation Freya will give jonny his wallet and the camera will pan him leaving the room. The door closes behind him.
- Script
(Jonny walks into the room, Freya is sat down reading a book)
Jonny: Hey Freya!
Freya: Morning Jonny. What you up to?
(Jonny looks around)
Jonny: Well I've lost my wallet and I think I might have left it in here.
Freya: Well I think I picked it up for you when I was leaving.
Jonny: Oh thanks Freya! You're a dream.
Freya: I know.
(Jonny looks around again)
Jonny: I'm so hungry! I'll see you later ok, and thank you again Freya.
Freya turns back to her book as Jonny leaves
Freya: You're welcome Jonny
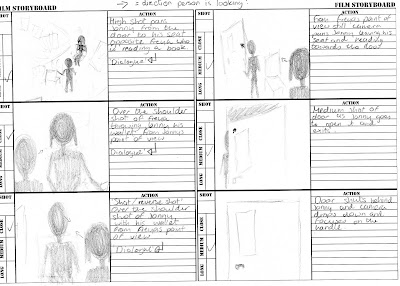
Storyboards


Final Piece
Report
Within our short film we managed to include a match on action shot as well as abiding by the 180 degree rule. We also included a birds eye view shot as the opening shot, a high angle shot during the conversation, a close up when opening the door, a wide angle shot as Jonny walks towards the camera, tracking as the camera follows Jonny through the corridor, an over the shoulder shot during conversation, we also used a tilt shot when Freya picked up Jonny’s wallet and gave it to him.
During edit, we used the razor tool to separate and cut clips, we used a dip to black video transition to close the short film, we used two layers to display and alternate our clips to prevent confusion and make the timing and cropping easier to see.
We used a digital camcorder to capture the film onto tape, then we uploaded the raw footage onto a computer using a usb cable connected to the camera and on Adobe Premier Elements we used the ‘Capture’ tool to copy the video from the tape into digital format on the computer. When all the footage was captured we separated the different shots into individual clips and named them accordingly to make the library of different clips simple and clear and easier to use when arranging clips on the timeline. Once this was done we ordered our clips on the timeline by the process of eliminating bad quality clips and trying to include a varied range of shot types. We then cropped the different clips so they fitted together in a logical order and the film ran smoothly, then we put on the finishing touches such as the dip to black effect and the 5 second title at the beginning. We then exported the film as a movie and as a windows media file, as one will be compatible with DVD and one will be compatible with Youtube. Finally we uploaded the film onto the Youtube account and embedded the film into each of our blogs.
We struggled to collect a series of shots that could easily be put together during edit although we managed to film most of the shots we found that we were unable to place them together in a chronological order due to the fact that we had no shots to fill transition periods and struggled to synchronise the audio in alongside the actors facial movements within the shots. We did manage to collect all the shot types that were required though including shot/reverse shot, it was just a shame that we couldn’t use the footage due to lack of transition shots and time to re-film.
Our original briefing was to create a film using a variety of shots which would prepare us to make our final product and make us more competent with a camera. Therefore in spite of the fact that we were unable to include some of the shots that were specifically asked for such as shot/reverse shot, we still managed to make a film that had a varied range of shots and good quality camera control, also this exercise will help us in our thriller filming as it highlighted our weak points and allowed us to pick up on what we need to change when filming in the future.


